

Cucumber stack:
One problem with Cucumber scenario automation
A while ago, when I was first introduced to the concepts of BDD, I was seduced by the promises of this methodology. But when it came to automating the scenarios, I was quickly disappointed.
We used to implement our scenarios on top of an EmberJs + Ruby on Rails stack. Like many teams, we implemented our scenarios at a very high level (using Capybara and then Watir to simulate users interacting with the system).
Those scenarios, although helpful in giving us an idea of what to implement, did not drive the development. We only automated them once the functionality was fully implemented.
Later on, I had the chance to work with Aslak Hellesøy on a few projects. He introduced me to the tools I will present in this article. He also made the automation of Cucumber scenarios the real driver for the development.
This article, although named “the perfect Cucumber stack”, is not simply a list of tools. It will focus on how to ease development with Cucumber and assist the developers from the beginning of a new feature until its deployment (or at least, once the task is considered done).
Brief disclaimer
In this article, I will consider Cucumber as a test runner. I won’t discuss BDD or scenario writing tips, since there are many resources available on these topics.
We’ll simply focus on how to automate the scenarios so it drives the development.
Prerequisites
This tool stack, and the development process behind it, work best under certain conditions. It’s not a real list of prerequisites (the approach could be adapted to other use cases) but simplifies setting everything up.
Web-based application
All the examples I will use for this article are web applications. I guess that this approach would work fine with other kinds of applications and that the principles could be applied to other technologies.
That said, two of the tools (Cucumber-electron and Cucumber-microdata) rely on HTML/Javascript, so they might be hard to use outside of web applications.
Side note: Electron applications are just websites rendered in a fancy browser, so they still count as web-based applications.
Frontend and back end using Javascript (or any layer over JS such as TypeScript)
Considering the previous prerequisite, the interface is most likely to be written using some Javascript-ish language sooner or later.
Having the same language for both frontend and backend speeds up a lot the setup of Cucumber scenarios used during the development process (alongside other advantages).

How wonderful it is to work with a JavaScript backend
In this post, I will address the benefits of having a single language for our frontend and backend (TypeScript in our case). Read the article here
That said, it is not impossible to use the principles detailed in this article using a backend written with something else than Javascript, but it would lead to two issues:
- it will be necessary to rewrite
cucumber-screenplayin the target language. That’s not a big issue, it takes about half a day to get something close tocucumber-screenplayworking (at least, when I did this in Ruby, that’s about how long it took) - the step definitions will have to be written in both languages. It might not be a problem when writing new steps, but might double the time allocated to maintaining the glue code.
A component framework that allows single-component rendering
I have mostly used this approach with React as the framework, which makes it easy to render a component with minimal setup.
A few years ago, I tried this approach with Ember.js, but it was pretty hard to render a component out of the Ember application (the Glimmer components were still pretty new back then).
Not sure if the approach would work with Ember today, as it’s been a while since I worked with it.
Decoupling between the business logic and the HTTP layer
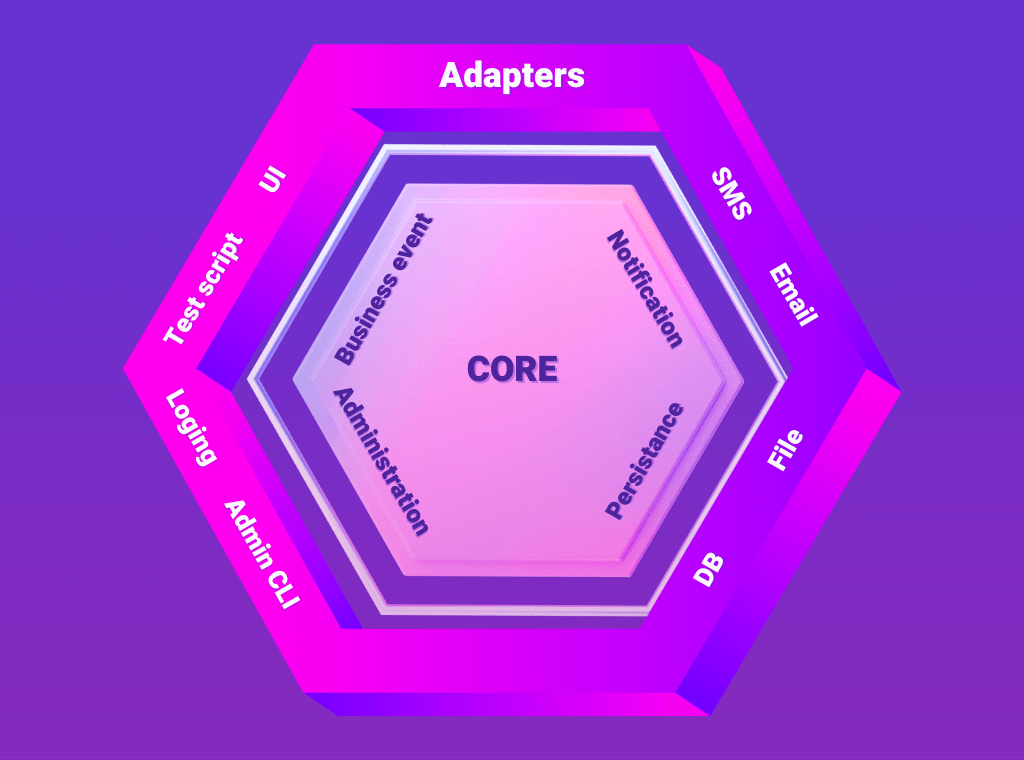
In order to validate the business rules alone, it is important to be able to access them directly, not only through the HTTP layer. The hexagonal architecture pattern is a great approach to achieve such decoupling, but there might be other way to do so.
Decoupling business logic and the HTTP layer enables lower-level testing than just the HTTP layer.
How Hexagonal Architecture made our developer’s life better
Hexagonal Architecture is great, did you even doubt it? Let’s focus on the benefits provided by this approach and how it applies to real use cases. Read here
Diving the development with scenarios
Now we have a goal (using Cucumber to really drive the development, not simply assess the validity of the code once everything is done). We have some context (a web application written in Javascript and using hexagonal architecture). But how do we do things in practice?
The development process
Before diving into the integration of Cucumber in our development process, let’s first see how we develop a new feature. Our approach is pretty classical and is done in four steps:
- implementing the business logic
- adding the HTTP layer which makes this logic available
- creating the components that will interact with the newly created API endpoints
- integrating those components into pages
To show how we can integrate Cucumber within those four steps, let’s take an example of a feature to be developed. Without any innovation, let’s consider a To-Do List application (did I mention the lack of imagination?) and the following scenario:
Plaintext
Scenario: create a ToDo list
  Given Jim is authenticated
  When Jim creates the todo list “Morning routine”
  Then Jim should have the following todo lists:
    | name            |
    | Morning routine |
Step 1 – developing the business logic
Before developing anything, we start by implementing the step definitions mapping for our new scenario. In this example, we consider that the authentication system is already done (and implemented in other scenarios).
Our first step definition will look something like this:
TypeScript
When('{string} creates the todo list “{string}”', async (
  username: string,
  todolistName: string
) => {
  const user = await finduser(username)
  await createToDoList(user, todolistName)
})

Then('{string} should have the following todo lists:', async (
    username: string,
    datatable: DataTable
) => {
  const user = await finduser(username)
  const todoLists = await getTodoLists(user)
  const expected = datatable.hashes().map(row => row.name)
  const todoListNames = todoLists.map(todoList => todoList.name)

  assert.deepStrictEqual(todoListNames, expected)
})
The functions createToDoList and getTodoLists are the ones holding the business logic, so our goal now it to implement them until the scenario is green. This scenario should certainly be achieved by unit tests, for example, to check the following cases:
- the name of the list will be trimmed (so the spaces before and after are removed)
- the name of the list can contain non-ASCII characters
The border between “what should be a unit test?” and “what should be a Cucumber scenario?” can be a bit blurry sometimes. Even after a few years of practicing with Cucumber, I am still puzzled sometimes. The way the tool is used also moves this border. Do we want the scenarios to be a base of discussion between the developers and the product team? Are we simply using the tool as a test automation framework?
Guidelines for Choosing Between Cucumber Scenarios and Unit Tests
As a rule of thumb, I usually ask myself those questions:
- is the test showing a business rule? then it should be a Cucumber scenario
- is the test validating a technical issue? then it should be a unit test
But even with those questions, there are still some blurry cases. Let’s get back to our example, we might want to limit the length of the to-do list name. For example, 254 characters, so it fits nicely in the database. This rule being driven but technical “limitations”, it would make sense to test it with a unit test. But we may want to warn the user that the name is too long, and it could be pretty nice to have a single scenario that ensures this behavior instead of two unit tests (one for the backend and one for the frontend).
I guess the answer to this question will be different for every team. Here at Gravity, we have scenarios testing this kind of cases. But I have to admit that I am still wondering if they really sure be there or not.
In any case, once we have our scenario passing at the business logic level, we can consider this part done and start focusing on the HTTP layer.
Step 2 – adding an HTTP layer
Now that we know that our core function works as expected, we can move on and make it available to the world. One problem though is that our step definition is tightly coupled with the core functions.
How can we use this scenario against our HTTP layer: duplicating the steps? Overwrite them?
A better solution is to add a client interface for our application, which will have two implementations:
- one at the business level
- other at the HTTP level.
Our clients look something like this:
TypeScript
export interface ICLient {
  createToDoList(userIdentification: UserIdentification, todoListName: string): Promise
  getTodoLists(userIdentification: UserIdentification: Promise<ReadonlyArray>
}

export class HttpClient implements IClient {
  async createToDoList(user, todoListName) {
    return createToDoList(user, todoListName)
  }

  async getTodoLists(user) {
    return getTodoLists(user)
  }
}

export class HttpClient implements IClient {
  async createToDoList(jwtIdentification, todoListName) {
  // fetchJson is just a helper setting the correct headers to avoid repeating them.
    return fetchJson(jwtIdentification, '/todo-list', { method: 'POST', body: {name:todoListName}})
  }

  async getTodoLists(jwtIdentification) {
    return fetchJson(jwtIdentification, '/todo-lists', { method: 'GET'})
  }
}
So now we have an interface that we can easily swap in our steps. We will adapt our steps a bit so they now use the client provided by the World object:
TypeScript
When('{string} creates the todo list “{string}”', async function (
    this: World,
    username: string,
    todolistName: string
) {
  const user = await finduser(username)

  await this.client.createToDoList(user, todolistName)
})

Then('{string} should have the following todo lists:', async function (
    this: World,
    username: string,
    datatable: DataTable
) {
  const user = await finduser(username)
  const todoLists = await this.client.getTodoLists(user)
  const expected = datatable.hashes().map(row => row.name)
  const todoListNames = todoLists.map(todoList => todoList.name)

  assert.deepStrictEqual(todoListNames, expected)
})
And the World object will look something like this:
TypeScript
class World {
  client: IClient
  constructor() {
    this.client = this.parameters.interactionMode === 'http'
       ? new HttpClient('http://localhost:1234')
       : new CoreClient()
  }
}
Now, depending on the value of parameter `interactionMode`, we can run the same scenario against the business logic or against the HTTP layer.
The parameters is obtained throught the configuration in the cucumber.js file:
TypeScript
const defaultOptions = '...'

module.exports = {
 default: defaultOptions,
 http: `${defaultOptions} --world-parameters ${JSON.stringify({
   interactionMode: 'http'
 })}`,
}
And in package.json:
JSON
{
 "scripts": {
   "test": "npm run cucumber && npm run cucumber-http",
   "cucumber": "cucumber-js",
   "cucumber-http": "cucumber-js --profile http"
 }
}
Implementing and Testing API Endpoints with NPM Test and a Client
When you run `npm test` your scenarios will be executed against the business logic and then against your HTTP controllers.
The introduction of the client will not only benefit your tests, but also the development of the application itself. Instead of having various `fetch` queries disseminated across your components, all the querying logic will be carried by the client.
With the implementation and testing of the two layers, it’s time to write components for user interaction with the new API endpoints. A third client for component level interaction doesn’t make sense if the client successfully decouples the steps from the interaction level. We need another decoupling level to choose interaction level with the system, either at the browser level or lower level.
Introducing Cucumber-screenplay
Cucumber screenplay is a library that partially implements the screenplay pattern inside Cucumber. I won’t detail the pattern, as the article linked before will be clearer than what I could do.
What Cucumber screenplay provides for our step is the notion of Actor. The actor is a pretty simple interface that can do 3 things:
- attempt an action (or ask a question, but those are the same thing behind the hood)
- remember a value
- recall a value
This simplicity forces us to think the same way a user interacts with the system. No one ever said “I will do a POST request on this /api/users endpoint” (except developers and QA, but they might have a good reason to say this). People might eventually say “I will create an account”.
Once again, we will have to change a bit our steps to take advantage of the screenplay pattern:
TypeScript
When('{actor} creates the todo list “{string}”', async function (
    this: World,
    actor: Actor,
    todolistName: string
) {
  await actor.attemptTo(this.createTodoList(todolistName))
})

Then('{string} should have the following todo lists:', async function (
    this: World,
    username: string,
    datatable: DataTable
) {
  const todoLists = await actor.attemptsTo(this.getTodoLists())
  … // the rest of the function does not change
})
Now what we need is the implementation of the task todolistName. Cucumber screenplay provides some facilities, as it automatically discovers the glue code. In our case, we would have the following files:
TypeScript
// features/support/tasks/sessions/createToDoList.ts
export const createTodoList: CreateToDoList = (todoListName) => {
  return async (actor: Actor) {
    const userIdentification = actor.recall('userIdentification')
    return this.client.createTodoList(userIdentification, todoListName)
  }
}

// features/support/tasks/sessions/getToDoLists.ts
export const getToDoLists: GetToDoLists = () => {
  return async (actor: Actor) {
    const userIdentification = actor.recall('userIdentification')
    return this.client.getTodoLists(userIdentification)
  }
}
(note: we consider than in the previous steps, when the user authenticated on the system, login information was remembered by the Actor)
With this refactoring, the step is clearer (as it focuses on what the user does, not how he does it). But it does not solve our original issue: being able to test at different levels of the application.
To do this, we will need another tool that will allow us to execute JSX code.
Step 3 – interacting at component level
Cucumber-Electron is a project that allows running Cucumber inside Electron (as the name suggests ;)). This allows to execute some JSX/TSX code and render components.
To use it, we simply have to add a target to our `package.json` file:
JSON
"scripts": {
  "test": "npm run cucumber && npm run cucumber-http && npm run cucumber-dom",
  "cucumber-dom": "cucumber-electron --profile dom”
}
And we can adapt our cucumber.js configuration file so, depending on the profile used, it will adapt which interaction to use:
TypeScript
module.exports = {
  default: `${defaultOptions} --world-parameters ${JSON.stringify({
    tasks: path.join(interactions, 'session'),
  })}`,

  http: `${defaultOptions} --world-parameters ${JSON.stringify({
    tasks: path.join(interactions, 'session'),
    interactionMode: 'http',
  })}`,

  dom: `${defaultOptions} --world-parameters ${JSON.stringify({
    tasks: path.join(interactions, 'dom'),
  })}`
}
Now, we can implement the tasks at the component level like this:
TypeScript
// features/support/tasks/dom/createToDoList.tsx
export const createTodoList: CreateToDoList = (todoListName) => {
  return async (actor: Actor) {
    const appElement = render()
    await getByTestId(
      appElement,
      'ToDoList.CreateForm.NameField'
    ).fill(todoListName)
    await getByTestId(appElement, 'ToDoList.CreateForm.Submit').click()
  }
}

// features/support/tasks/dom/getToDoLists.tsx
export const getToDoLists: GetToDoLists = () => {
  return async (actor: Actor) {
    const appElement = render()
    // extract the data from the component
    return todoLists
  }
}
Those steps will help us drive the development of our two new components. As we rely on test IDs to interact with the component fields, we do not need to know how the component will be structured to know how to interact with it.
Extracting the data on the other hand can quickly come a bit tricky: should we query the components using CSS? XPath? How hard will it be to maintain it. Hopefully, there is one last tool in this stack that will solve this issue for us.
Introducing Cucumber microdata
Cucumber microdata is a library meant to extract microdata from a HTML fragment (or page). Microdata are a way to add machine-readable data in your HTML component.
Let’s take a look at the component rendering the list of To-Do Lists. It could originally look something like this:
TypeScript
const ToDoLists: React.FunctionComponent = () => {
  const [todoLists, setTodoLists] = React.UseState<ReadOnlyArray>([])

  // Some useEffect here to fetch the lists.
  return (
    <table>
      <thead>
        <tr>
           <th>ID</th>
          <th>Name</th>
        </tr>
      </thead>
      <tbody>
        {todoLists.map(todoList => (
          <tr>
            <td>{todoList.id}</td>
            <td><a href="{`todolists/${todoList.id}`}">{todoList.name}</a></td>
          </tr>
        )}
    </table>
  )
}
If we want to extract the data from this component, we will have to rely on the DOM structure to find the values. If we decide to change the layout or the structure (for example, if we decide to use a <ul> tag instead of a table), we will have to update the glue code.
We can easily introduce microdata in this component to make the extraction easier:
JSX
{todoLists.map(todoList => (
  <tr>
    <td>{todoList.id}</td>
    <td>
      <a href="{`todolists/${todoList.id}`}">{todoList.name}</a>    	</td>
  </tr>
)}
Thanks to those microdata, extracting the to-do list objects would be as simple as this line:
JSX
const appElement = render()
const todoLists = microdataAll('https://example.com/schemas/ToDoList' , appElement)
Now, whatever changes are applied to the layout (as long as the microdata are kept) this glue code will keep working.
More importantly, we can even write the test code before the actual component, easing a real TDD approach for developing those.
Once the scenarios are passing at the component level, we can now integrate them into the real pages of the application.
Step 4 – testing as the real user
Sadly, this is where we reach the limits of this stack. We could render the full pages into Cucumber-electron (after all, they are React components too), but we would also have to handle the routing (or mock it). At this level of testing, I would feel more confident in the tests if they were really closer to what the user really experiences.
To reproduce the user experience, the best would be to drive a real browser using tools such as Selenium or Cypress. Using a real browser would also prove pretty useful to transform those scenarios as smoke tests, in order to ensure the deployment was really successful.
In the case of Selenium, it should be fairly easy to integrate to this stack trace, by adding a new level of tasks. We would then have three implementations of each task: sessions, dom and browser for example.
Integrating Cypress with Cucumber-Screenplay: Challenges and Progress
In our case, we wanted to use Cypress to drive the browser. The first reason for this choice was that it is the test tool of most of our users (so it would be easier for us to get into their shoes by having a similar tool stack). The second reason was that Gravity can integrate with Cypress.
And the main issue here is that Cypress is not simply an automation library (like Selenium, Watir or Capybara). It is a complete test automation tool, and thus was not designed to integrate with other test automation tools.
There are approaches such as cucumber-cypress-preprocessor which are meant to allow the use of feature files as an entry point for Cypress. But with this tool, the Cucumber runner is not used, so we can not take advantage of Cucumber-Screenplay for example.
Today, the only solution I found to reuse the Cucumber scenarios in Cypress is to duplicate the glue code in the steps. I am currently working on of proof of concept to integrate Cypress within Cucumber-sreenplay. Although I have started to achieve some results (with the ability to test both components and pages on a simple use case), it is not yet ready for actual testing purposes.
Conclusion
Thanks to this tool stack, we are now able to use our Cucumber scenarios all along the development of our features, instead of waiting until everything is done to run the tests (or worse, as this sometimes happens, skip the test implementation because another task needs to be done).
The redaction of the scenarios also benefits from this stack: as you know that the scenarios will be executed at “low level” (business level and API), you do not focus on how the user interacts with the tested application, but on what they will try to do (it does not really make sense to talk about clicks and fields at the API level). This generally eases the readability of the scenarios and also their maintenance.
Stay tuned!
Smoke Tests: What is-it?
Testing
Gravity
Définition Smoke tests are, according to ISTQB definition: A test suite that covers the main functionality of a component or…
Read the article
Product Update – March 2024
Gravity
News Gravity
Gravity
Hello! 🌸 Spring has arrived with its share of good news: including our Product Update!! The features we’ve been talking…
Read the article

Combining Usage and Requirement Coverage for Higher Quality
Gravity
Testing
Gravity
Requirement Coverage in a Nutshell Requirement coverage is a crucial metric in software testing that gauges the thoroughness of the…
Read the article